In this post I will show my simple Obsidian setup that allows me to write posts for my blog in a very simple, and automated way.
how my blog works?
I am using AstroPaper as my blog template, this Astro theme allows me to have a minimal setup that generates pages based on a /src/content/blog directory, inside that I can write markdown files.
the structure of a blog post file
Every post has to start with markdown front-matter in the following style
---
title: Title
author: Paul Tal
pubDatetime: { { date } }
slug: { { title } }
featured: false
draft: true
tags:
  - first
  - tag
  - second
  - tag
description: This is the post description
---

content of the post goes here
where does Obsidian shine?
Obsidian, if you think about it is a fancy Markdown editor meaning that I could potentially use it to open my blog repository and edit files directly there.
step 1: basic file editing
By just opening my blog’s repository as-is in Obisidian I can already create and edit Markdown files that represent my blog posts.
step 2: front-matter template
Obsidian offers a way to automate the front-matter. I have created a templates/ folder at the root of my repo and I’ve put there a new Obsidian template representing the front-matter every post needs. Then, by going into settings i can choose that folder to by my Obsidian Templates Folder and then using the command palette I can import that into any blog post.
step 3: automatic attachments
By using the Custom Attachment Location community plugin from Obsidian I was able to set it up so when I paste an image into my notes, it automatically places it into the /public/[noteTitle]/ folder.
But by default, when pasting an attachment, Obsidian only places a simple link like this [](filename) in Markdown, but for images to work with AstroPaper, the links to images should look more like [](/public/[noteTitle]/{filename}.
25.06.2025 - image pasting seems to be broken right now
01.07.2025 - I’ve fixed image pasting (see end of post for update)
step 4: sync and deploy
By using the Git Obsidian plugin, I can simply run a command present in the command palette and this will automatically commit my changes to GitHub. After that, Vercel will automatically deploy my update.
Note: I have disabled automatic Git commits because I want to be able to choose when a new update is deployed
conclusion and ideas for the future
This blog post was written while in the process of setting this environment and I must say, it feels great to be able to write blog posts in this way.
- I don’t have to worry about where the attachments go, I simply paste them into my Obsidian note
- I have a nice preview of the content
- I can choose when to deploy a new update just by running a simple command
In the future I would love to have Excalidraw integrated in this workflow, but I have go figure out how my site would render that. Some ideas I have are:
- automatically convert excalidraw to images and store them in attachments
- modify the source code of my site to work with excalidraw files
…we’ll see!
update (July 1st 2025) - getting image pasting to work in Obsidian
After reading the Astro Images docs I found out that I needed to provide a relative path inside the markdown in order for Astro to correctly understand and build the image.
So, the location of new attachments is inside the src/assets folder (yes, I throw every single attachment in there, I have a plugin that does some cleanup for orphaned images tho). And then I import/use them in my Markdown notes using a relative path to that assets folder.
Here’s my current config for the Custom Attachment Location obsidian plugin:
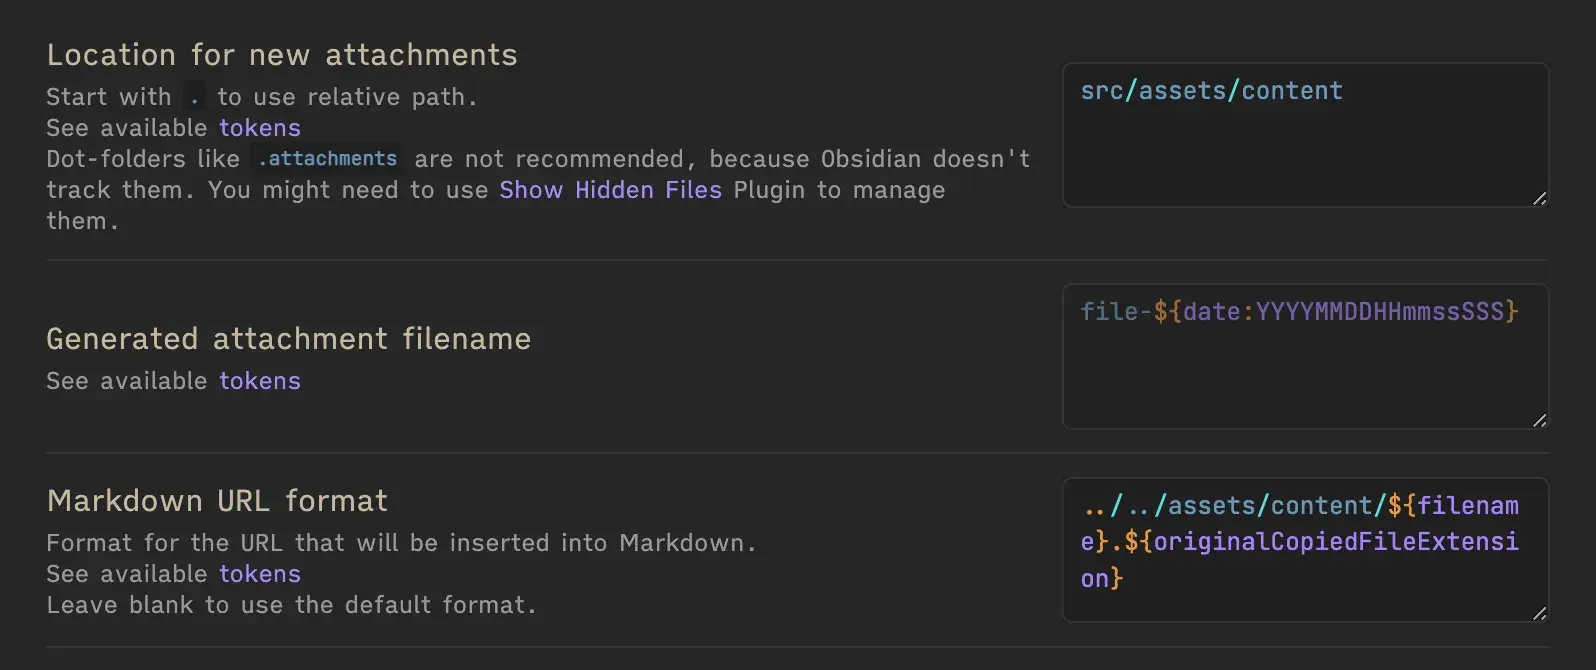
Note: Probably using some more complex setting for this plugin in the future I might change it to organize the assets into subfolders, but for now, it just works.